|
Focus & Rangefinder Adjustment |
|
Improper lens changing methods can upset the RF sensor adjustment. To prevent or minimise the possibility, remove the lenses only when necessary, and ALWAYS SET THE LENS TO MINIMUM FOCUS BEFORE REMOVING OR PUTTING THEM ON. |
|
If pictures are still not in focus even with a properly adjusted, correctly reading rangefinder, the lens working distance, or the camera working distance, or both would be the fault. For the lens/camera combination to work, the lens must be able to focus at infinity when mounted on the camera. This can be visually checked by placing a groundglass on the film plane. But with cameras like the FED and Zorki, this isn’t possible. The only way to check this is by measuring the lens-flange to film plane distance. Some cameras were adjusted to accommodate only the lens supplied with them, and it is quite possible that the camera may no longer have its original lens. A practical solution is to measure and adjust the camera body first so that it will have the standard 28,8 mm register, and then adjust all the lenses to be used with it to the same value. |
|
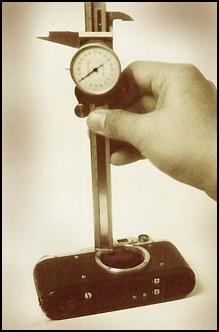
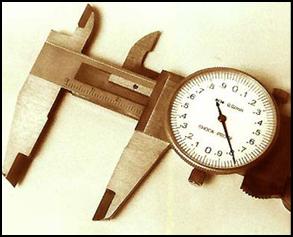
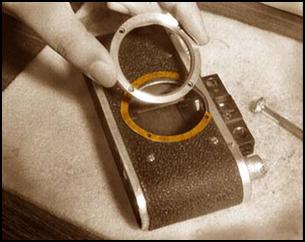
Measuring the Lens Register with a Caliper. |
|
The measured distance should be between 28,78 to 28,82 mm. Anything more or less than these values would make accurate focus impossible. If your camera’s lens working distance reads beyond these measures, you will have to make adjustments. Start by removing the lens mount. Beneath the mount are sets of paper spacers– or “shims”. You will realise by now that these bits of paper are the ones responsible for keeping the parts at their necessary positions. If the initial reading gave a measurement which was short of the required value, add more shims. If the value was too much, remove one layer. Install the lens mount back, with its screws properly tightened. Measure again. If the measurements still don’t conform, remove the lens mount again and add or remove shims as required. (More about shims below.) |
|
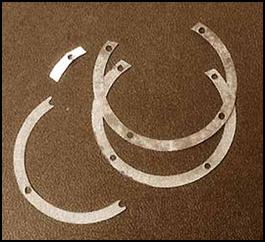
Right, paper shims. Full cuts used for overall distance alteration, and partially cut or bits used for specific areas which need modification. For instance, the small shim bit on the left was found under the upper left setscrew of the lens mount, where it raised the mount by about 0,02 mm. Such shimming layouts may be necessary to achieve the necessary mount flange-to-film distance from all parts of the mount surface. |
|
All measurements start from the surface of the pressure plate as it is pressed against the film rails by two thin leaf springs. Given the delicacy of the arrangement, care should be given so that the plate is held at the right place always. This position can be upset by improper film loading, or even touching the plate through an open shutter. The springs’ well being can be jeopardised by undue force brought about by inserting foreign objects into the film track, or touching the pressure plate. |
|
SETTING THE LENS WORKING DISTANCE |
|
Shims found under the lens mount: whenever the lens mount is removed, or the camera disassembled, try to remember where the paper spacers were originally found. They were placed there to give the correct lens working distance specifically to the camera body. Paper is the common material used. Each disassembly and reassembly requires subsequent measurement of the lens flange to film distance, which may require addition or removal or rearrangement of the shims. |
|
* |
|
Shims can be made from stiff brown paper, tin foil, mylar, etc. I have always used paper. Some experts do not recommend using paper, for reasons of dimensional instability– it changes shape or thickness due to effects of temperature or humidity. I haven’t had problems with paper, and it has been the original material used in these cameras. Paper can be waxed or laminated with varnish to increase its stability. I’ve even used Starbuck’s pastry wrappings for shimming lens mounts! |
|
The shims can be made from paper of various gauges to accommodate the necessary adjustments. You will find too, that shims could be cut into half or even smaller, and placed precisely on parts of the mount which need to be raised.
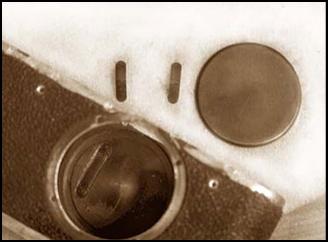
Installing and removing the lens mount screws may be difficult since the retainer to which they lock on falls into the body. They can be glued (using rubber cement) so that they will remain in place to accept the screws whenever they are put back in.
After adjusting the working distance, recalibrate the rangefinder for infinity and close distance focus. Altering the position of the lens mount relative to the film plane also upsets the rangefinder adjustment.
If focusing remains inaccurate even after the camera rangefinder is calibrated, it may be the lens which is at fault.. It has to adjusted as well, to conform with the newly-adjusted camera’s focus register. The lens can be checked with another camera (whose lens register has been proven correct) with a removable back, using the groundglass focus method. Point the camera and lens towards a very distant object. Keep the camera’s shutter open, and place a focusing ground glass on the film plane (the rough side facing the lens, and the glass should bear on the film rails). Observe the sharpness of the focused object. If the object appears sharp, and the lens’s distance scale reads ‘infinity’, then the lens is properly adjusted.
Some early FED (the „NKVD“ types) have variable lens registers and lens mount threads. These cameras often have lenses which must match not only their mount, but their individual focus registers as well. The camera and lens are matched at the factory. It is often difficult to determine whether a FED of this type has its original lens, and when found with a non-matched lens, focus calibration is often hard to achieve.
But if the lens’ scale reads before or beyond the infinity mark to give focus sharply at infinity, the lens needs to be adjusted. Like the camera, the lens can be adjusted so that its optics can be positioned closer or farther relative to its mount.
Once the camera, and the lens as well, have the standard working registers, ALL other LTM lenses, in theory, can be used with FED and Zorki.. Unfortunately, it is not just the focus registers which prevents this. The Lens’ and Lens mount’s starting and stopping threads have to be standard as well. Some Industars cannot be used with Leicas or Canons because their focusing tabs stop right in front of the RF or VF windows. Some Leitz or Canon lenses, on the other hand, used a narrow, tongue-shaped coupler which catch on the pointy RF sensors of FED and Zorki. Very early FED and FED lenses used a slightly different thread pitch which would may not make it compatible with lenses with the ‘true” LTM thread pitch. |